Warehouse Expansion
In this use case, we will explore how to use Convect AI’s network design tool for Warehouse Expansion. The objective is to expand an existing warehouse network by adding a new facility to better serve customer demand and optimize overall network efficiency.
Problem Statement
We have 95 customers with varying demand levels, currently served by 3 existing warehouses. Due to growing customer demand and operational constraints, we are planning to add a fourth warehouse. The goal is to determine the optimal location for this new warehouse to minimize costs and improve service efficiency.
Key considerations include:
- Service Distance: Each customer must be served by at least one warehouse within a maximum distance, ensuring that service remains effective after the expansion.
- Customer Reassignment: The addition of a new warehouse will require reevaluating which customers are served by which warehouse, to balance demand distribution.
- Cost Minimization: Building a new warehouse incurs a fixed cost, so the goal is to optimize the overall operational cost while improving service levels.

This use case will demonstrate how to configure the network design tool to solve this warehouse expansion problem, with the goal of minimizing costs and maximizing service efficiency across the network.
Preparing Data
Before tackling the warehouse expansion problem, preparing the appropriate input data is crucial.
Download the Input Data Template
The input data template can be downloaded here.
1. Parameters Sheet:
Configure the following essential parameters for this use case:
- Minimum Number of Sites and Maximum Number of Sites: Set both to 4, indicating that the total number of warehouses after expansion will be four.
- Minimum Candidate Sites and Maximum Candidate Sites: Set both to 3, to include the existing three warehouses in the solution.
For other parameters, such as cost considerations and capacity limits, set them according to your business requirements.
2. Customers Sheet:
This sheet provides detailed information about all the customers, each with varying demand levels. The key columns include:
- Customer ID: A unique identifier for each customer.
- Customer Address: The location of the customer.
- Latitude and Longitude: Geographical coordinates, which will be used to calculate distances between customers and potential warehouse sites.
- Customer Demand: The total demand from each customer, which must be met by one or more warehouses.
This data will be used to assign customers to the closest warehouse locations and ensure their demands are fulfilled.
3. Sites Sheet:
Include the details of all potential sites for the new warehouse, as well as the existing warehouses. Key information to provide:
- Site ID: A unique identifier for each site.
- Latitude and Longitude: The geographical coordinates of each site.
- Mandatory: Set to TRUE for all existing warehouses to ensure they are included in the final network design.
This sheet is crucial as it guides the network design tool on where new and existing resources are located, ensuring an optimized distribution network.
Establishing a Base Case
Before expanding the network, we first need to establish a base case with the existing 3 warehouses. This will provide a benchmark for comparison.
Make a copy of the previously downloaded file, and modify the input parameters:
- Minimum Number of Sites: Set to 3.
- Maximum Number of Sites: Set to 3.
By setting these values, the network design tool will focus on optimizing the current setup of 3 warehouses without allowing for any additional ones. All other parameters, including customer demand and site locations, remain unchanged from the previous step.
Using the Network Design Tool to Solve the Problem
To establish the base case with the current set of warehouses and analyze the warehouse expansion scenario, follow these steps:
-
Login to Convect AI's Flow Platform Open your web browser and go to https://flow.convect.ai. Enter your login credentials to access the platform.
-
Open the Network Design App Once logged in, locate and open the Network Design app.
-
Create a New File Click the "Create File" button to create a new project.
-
Upload the Baseline Input Data File On the file creation screen, enter any necessary information (such as the project name) and upload the input data file for the baseline scenario (where the number of sites is set to 3). Then, wait until the data import process is complete.
-
Solve the Problem Click the Solve button to begin the optimization process. Wait until the process is complete.
-
View the Results Navigate to the Output View tab to see the results in a spreadsheet format. To visualize the customer-site assignments and other insights, click the Graph View tab to view built-in visualizations.
Repeat for the Warehouse Expansion Scenario
Repeat steps 3 to 6 for the warehouse expansion scenario, using the previously prepared input file (with the number of sites set to 4). This will allow you to compare the results of both the baseline and the expanded network scenarios.
Comparing Results
To compare the results of the 3-warehouse and 4-warehouse scenarios, follow these steps in Convect AI’s Flow Platform:
-
Open the Network Design App After logging into the platform, navigate to the Network Design app.
-
Go to the Workbench Page In the Network Design app, click on the Workbench page to view your previous runs.
-
Select the Files for Comparison Find the two files corresponding to the 3-warehouse and 4-warehouse cases. Select both files for comparison.
-
Open the Compare Option Click the three-dot icon to the right of the "Create File" button. This opens a dropdown menu. Select Compare from the list.
-
Configure Comparison In the popup box, set the View Type to Output View, and choose the Scenario Summary table. Click Confirm.
-
Compare the Results The page that follows will display a comparison of the selected files. Key metrics such as total cost, service levels, and other performance indicators will be shown side by side, making it easy to analyze the differences between the two scenarios.
Data Analysis
1. Total Cost Comparison
-
3-Warehouse Case: The total cost for the existing network configuration (with 3 warehouses) is $3.06M. This includes both operational costs for the warehouses and transportation costs incurred to serve customers.
-
4-Warehouse Case: After adding a fourth warehouse, the total cost decreases to $2.93M. This reduction in cost is due to improved efficiency in customer assignments, which minimizes transportation costs by bringing more customers closer to their assigned warehouse.
2. Location of the New Warehouse
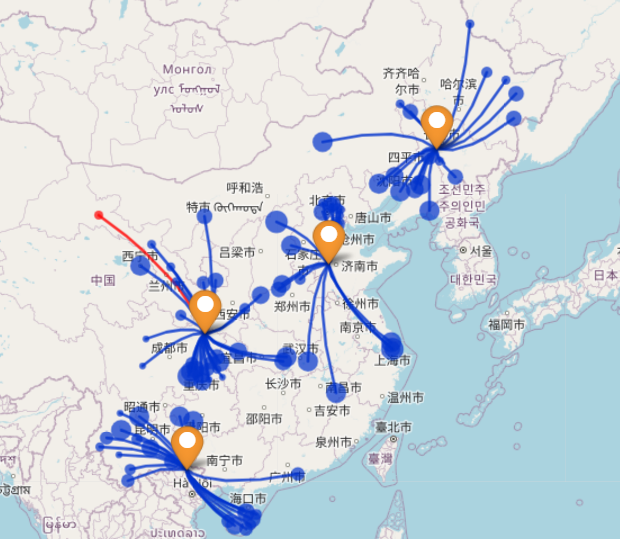
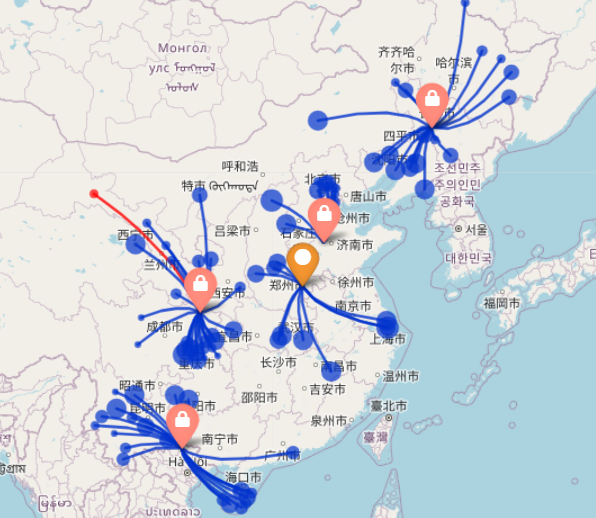
In the Graph View of the 4-warehouse scenario, the location of the fourth warehouse is clearly shown. The new warehouse is strategically placed to balance demand and reduce travel distances for customers located farther from the original 3 warehouses.

3. Customer Assignments
-
In the 3-Warehouse Case, each warehouse serves a larger number of customers, leading to longer travel distances and higher transportation costs.
-
In the 4-Warehouse Case, some customers previously served by the original warehouses are now assigned to the new warehouse. This redistribution of customers reduces the load on the original warehouses, further optimizing the network’s overall efficiency.
Conclusion
Expanding the warehouse network from 3 to 4 warehouses leads to a significant reduction in total cost while also improving the efficiency of customer assignments. This demonstrates that strategically adding a new warehouse can not only improve service levels but also result in cost savings for the entire network.